2. Engine
- Engine Issues
- The Puller
- August 6th Rethink
- Threads
- Water Pump Trick
- Oil Pump Testing
- Engine Installation
- Blue Haze
- Pipe CLeaning and Mini-Rollout
Engine Issues

As I was picking through the Kincardine Rubbermaid containers, Fred and Janice here in Calgary made me an offer which I couldn't refuse of another 1973 model year bike. This one has been sitting outside since Adam was a boy and is a very tired old soldier, but it does have the right engine for the model year and a few other good bits and pieces so it should work out, assuming that I can get the engine apart - getting the barrels off these older GT750's can be next to impossible. I've borrowed Fred's puller which should make it easier, but we'll see.
So the plan then is as follows:
- Keep the Kincardine Rubbermaid Suzuki rolling frame seen below to the left as it is already nicely painted - the front end has a few problems, as does the centre stand, but I have some parts on hand left over from the GT/GS750 project bike I finished earlier this year so I don't expect too much trouble - plus it has paperwork which is a bonus !
- Use the engine, instrument cluster, radiator and a few other bits from the donor bike from Fred and Janice seen in the middle photo - most of the rest of the bike is too far gone to salvage. The tank, while not really usable, does have the right pattern for the paint and so will be useful as a guide.
- At some point later this year or next, I'll have something that will resemble the photo to the lower right !
The next step then is to strip the donor bike down, salvage what I can and also go through the Rubbermaid tubs that came with the Kincardine bike to see what should be kept from it. It should at least keep me out of trouble !


Back to Top
The Puller

Suzuki actually recognized that getting the barrels off was a problem quite early in the production of the GT750, and made a change to the cylinder head bolt washers (service bulletin GT-5 of May 1, 1975) to try and address the corrosion issues, and also made available a puller (service bulletin GT-25 of August 15, 1975). Both of these service bulletins, and all the others, are available here . The problem with the Suzuki puller bolts, is that if the barrels are REALLY stuck, then you risk stripping the threads you have to cut into the barrels per their procedure, and then you are totally stuffed !

This is a view showing the barrels pulled up part of the way; you can see the degree of corrosion on the studs which meant they really did not want to let go ! In a case such as this, a puller is almost mandatory.
I was just tearing this specific engine down for parts as it is one of two that was included in the 1973 Suzuki GT750 basket case that I picked up in Kincardine, Ontario. While the barrels, crank and pistons were all scrap (lots of severe damage, and signs of seizure), there was a brand new (or at least virtually unused) nylon water pump gear and as well, the side covers,gear clusters, and the actual crankcase halves were in good shape as well. As the pistons were first over size, it looks as if the engine had been rebuilt, and then blown up very soon after putting it back on the road. I'm sure I will be able to use a few of the engine components in other projects at some point.
Back to Top
August 6th Rethink
More problems - so making a few changes to the plan.
Once I had the Calgary donor bike stripped down, I was able to put its frame along side the Kincardine frame and then noticed a few differences. Earlier GT750 frames in 1972 had a 2 bolt hole side stand and in late 1972 for the 1973 model year, this was changed to a 3 bolt side stand mount. For some reason, the Kincardine frame was the earlier 2 bolt hole style, and the side stand itself was not original and would need to be replaced. As well, on closer inspection the Kincardine frame had a broken engine mount. The engine and frame for the Calgary bike were original and so the serial numbers very nearly matched (Suzuki frame and engine serial numbers seldom match exactly, and can actually differ by a wide margin). As they were original and close, it seemed a shame to give that up. The frame was cracked in the rear fender stay - not really a key structural member and so could easily be welded. The centre and side stands were both in very good shape. The engine was another story entirely. The Kincardine frame of course had no engine, and so would have been a 'bitsa' bike anyway - given a choice then of building a 'bitsa' or doing a restoration, I decided to restore the Calgary frame and engine. Of course nothing is ever easy .....
Whenever the Calgary bike had been parked - sometime back in the 1980's - the oil was allowed to drain out and then it had sat outside in the snow and rain for the next 25 years or so. The barrels came off easily using the puller, but the sight that met my eyes once I cracked open the side cover wasn't pretty.


There was a lot of rust - my guess is that the engine probably had been in good condition when parked, but over the years had gradually become seized solid with corrosion. Basically other than the cases, barrels, cylinder head and side covers there wasn't much else I could really use - luckily I have several sets of transmission clusters, and crankshaft assembles so I can replace all the internals with parts from other engines. This does cause a bit of a potential problem though, as the number of teeth on some of the drive and intermediate gears changed over the model years, and I'm not sure which model year cluster sets I have on hand. As well, I will have to mix and ,match the gear sets a bit to minimise the lash in the drive train. Normally there are paint codes on the inside of the engine case, and sometimes on the gear clusters also to assist with lash adjustment, but for some reason this engine had no paint codes inside at all. The water pump, not surprisingly, is shot but I can either rebuild it or replace it. More work than I had expected, but all very doable.
Today I took in a GT750 crankshaft to Greg's Cycle here in Calgary to have new seals installed. Assuming that nothing much else is wrong with it, I expect It should be ready in about 2 to 3 weeks. I still need to check the barrels to see whether I need to use over-size pistons, or just re-use standard size ones, but that can wait till after the crankshaft is finished, and I have the gear clusters, crankshaft and all the other bits and pieces back in the cases.
The next few weeks then will be busy getting the above items sorted, plus I have another item I need to prepare for also. Our club is having a 'powder-coat' day here in Calgary in early September which I'd really like to take advantage of. This is made possible by a local supplier and basically you show up with your items prepped and ready to go, and take them home freshly powder coated for very reasonable rates. With a bit of luck I hope to have both a GT750 and GT500 frame ready to go, together with all the bits and pieces (battery box, side and centre stands, swing arm etc.).
Of course that means I'll need to strip down the 1977 GT500, which I haven't really even looked at yet.
Back to Top
Threads
A common problem with early 1970's Suzuki's is having the exhaust bolt thread strip that hold the exhaust flanges (and therefore the exhaust pipes) to the cylinder head. This is due to the soft aluminium alloy just wearing away over time with the repeated removal and installation of the exhaust pipes for cleaning or maintenance. An option to avoid this wear is to install studs to replace the bolts, and I know a few folks who have done that on their bikes, but I prefer the factory look. Being stripped is bad, but making it worse is that often what will happen once the original thread is gone, owners will open up the hole to the next bolt size (10x1.25mm) and just put in a larger bolt. Of course, once that one strips - and it's just a matter of time - then you are truly stuffed. In the past, your only real option at this point would have been to find someone who could TIG weld more metal back in, and then drill and tap a new threaded hole and to do this would generally require the engine be removed from the frame as the working space is quite limited.
For the 'first time' failure mode, installing a Heli-coil thread repair insert is generally what most shops will do - this is usually an easy, quick, long-lasting, relatively low-cost solution if you are lucky - the 'luck' part mostly has to do with whether you can access the thread to do the install without having to pull the engine - in some cases on a motorcycle it just isn't possible.

The inserts themselves are about $1 each (in the US), and are made of a hard stainless steel wire which has been coiled into a spring, and which you just thread into a retapped hole.
But what about the case where the hole has already been opened up to a larger size and has now been stripped again ? Or for that matter is a stripped Heli-coil ? I suspect you have a better chance of winning the lottery, but I seem to be blessed with bad luck when it comes to exhaust bolts so I've included this as a possibility. For this issue TIG has been pretty much the only option - till the folks at Time-Sert came up with their Big-Sert product line. These are oversize thread inserts - plugs actually - and are really clever, but also more expensive than Heli-coils. Of course, if your other only option is to pay for someone to do some speciality aluminium welding, then it starts to look like a bargain !
In preparation for having my 1973 GT750 cylinders re-bored and bead blasted, I decided to first tidy up the exhaust ports which had a couple of stripped threads - one was suitable for a Heli-coil repair as it was just a damaged 8x1.25 mm thread and so fairly small. The second one was a small crater of a hole that you could almost drop a 10mm bolt through without it touching, so I decided to try the Big-Sert and see how well it worked. Ten minutes later, as can be seen in the lower right of the photo, I had a brand new, very nice looking 8x1.25 mm threaded hole and was very pleased with the result ! The inserts are available in various lengths - for this size of bolt between 8 and 20 mm in-depth. I had the 'stock' length ones of 11.7 mm, as well as some longer ones at 16.2 mm, and opted to install the longer ones just to give more contact area on the bolt given it was after all an exhaust port being used to secure the exhaust pipe, and so subject to extremes of temperature and vibration.
As with Heli-coils, you typically buy a kit for each size of thread you are repairing. The Big-Sert kits contain all the bits and pieces you need to do the installation: drill bit, tap, reamer, install tool and inserts (of course you have to supply your own electric drill and tap handles). Unlike Heli-coils, Big-Serts are threaded plugs with a cam-lock built-in to stop the insert from moving once in place. It's a nice design and ideal for this sort of repair - but they are about twice the price of Heli-coils (if you shop around). I bought mine from ToolsQwik in the US - very helpful and easy to deal with, good prices and fast delivery. After including the postage cost, and currency exchange (there is no duty charged to bring these into Canada - just GST which you'd have to pay anyway), I still saved about 30% over what I was quoted for the same items here in Calgary, so as always it does pay to shop around.
I will be dropping the cylinders off at a shop south of Calgary in De Winton called RPM Services next week after Christmas, to be bored to first over size. I already have the pistons, rings, gudgeon pins etc., so it now looks like I will be starting to re-assemble the engine sometime in January. In the meantime, I still have to finish the wiring and sort out the fuel tank and a few other odds and ends on the GT500 I'm also working on, so I'm not short of things to do !
Back to Top
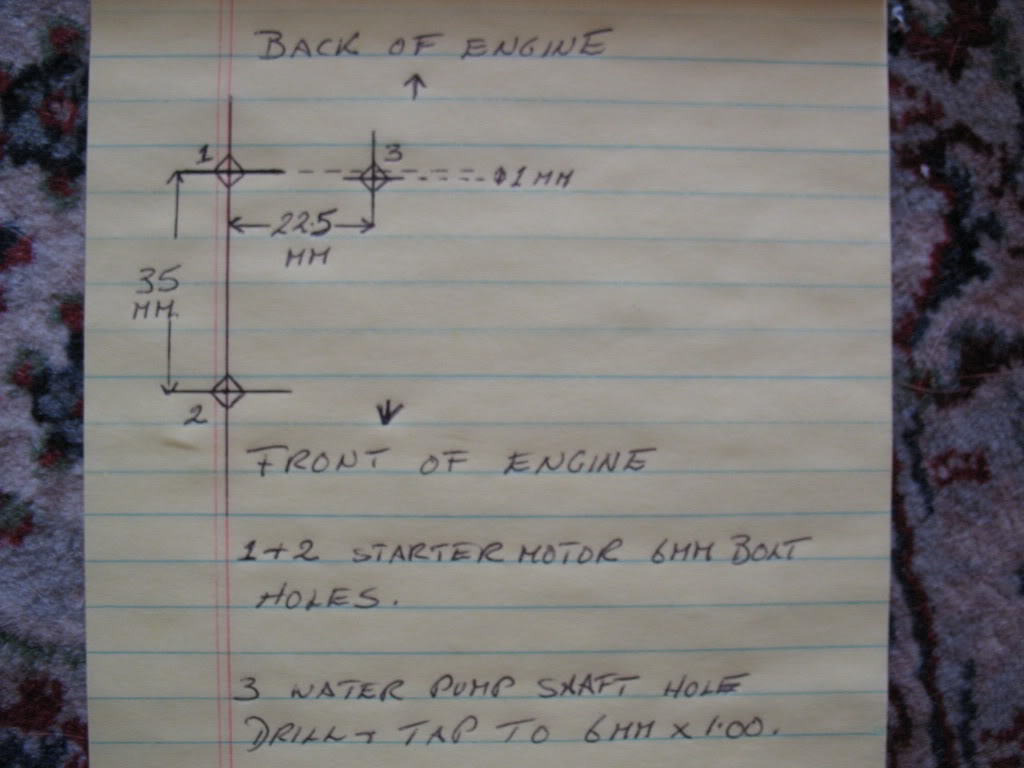
Water Pump Trick

In the photo to the upper right, the screw driver points to the location of the 6mm x .1.0 grub screw (in the US they are known as a "set screw"). You need something that will sit flush with the upper surface of the engine case otherwise the starter motor has clearance issues and don't forget the Loctite !

Hopefully I'll never need to use this, but it is a handy trick to have up your sleeve !


Update: after some additional checking, I'm now convinced that on my engine the cylinder studs did not originally have a shoulder as these were introduced at engine number 38060. Over the next few days I'll get the engine rebuilt and then perhaps think about putting it back into the frame. I do still have some repair work to finish on the tank and fork ears before sending them out for paint so there are still lots of things to be done.
Back to Top
Oil Pump Testing

I previously highlighted a few of the other updates I made during the engine rebuild here and at last I had got to the point where I was ready to button up the cases, as can be seen to the left. I had four GT750 injector oil pumps available to me - one was definitely suspect as on the bike I'd pulled it from, the oil injector tank was bone dry and missing its cap, which likely meant that water had been able to get into the pump itself. Although it turned, I didn't really trust it, and on the three other pumps I didn't have any history. A really good write-up on the Suzuki injector oil pumps is available on Richard's site here.
Having a working oil injector pump is a must - unlike other 2 strokes, the crankshaft design used on the GT750 Suzuki means you will likely burn out your main bearings if you try to run solely on pre-mix with out having the crankshaft re-designed. This sort of conversion is possible - Bill Bune's shop will do this for folks who need to run pre-mix for vintage racing applications for example, and I'm sure there are others. In my case though, it was going to be injector oil so I had to confirm I had a working injector oil pump !

Back to Top
Engine Installation

A method I've used previously for removing an engine has been to lay the frame on its right side, unbolt everything, and then lift the frame off the bike. Many people have also done the reverse to re-install the engine, so I thought I'd give it a try, and I'm pleased to say that it worked like a charm ! With the engine blocked up securely so that it wouldn't fall over and damage my lovely oil stained concrete floor, I just lifted my frame over the top and into position, slipped in a couple of bolts to secure it and then gently lowered it back so it sat upright on the motorcycle lift : job done ! The whole process took about 20 minutes start to finish with no back ache, no mashed fingers, no colourful language and there isn't a scratch on the paint that I can see. To the right is a photo of the freshly re-united engine and frame. Doing all this work on the lift, had the advantage of being able to adjust the working height so it was comfortable, and so much easier on the back. Recommended.
From there is was a simple step to re-install the front forks, and then get the frame back up onto the centre stand so I could remount the swing arm etc.
Back to Top
Blue Haze

I will have to take apart and try again to fix the fuel petcock, as I still do not have a good shut-off on the vacuum operated valve assembly, but that is minor. New ones are still available if all else fails, so it is currently more of an annoyance at this stage and will not slow down further testing and engine run-in, although it will need to be working properly before I try to have the bike certified for the road.
Next on the agenda is the finish off the front brakes, tidy up the the control cable routing, finish the seat and attend to a small oil leak on the right side. The right side engine cover was not in great shape on the gasket surface, but it was the original one so I really wanted to reuse it. While I had lapped the faces as best I could, there were still a couple of damaged spots that it now appears the gasket could not properly seal. I will probably just use a small a bit of JB Weld to fill in these nicks on the joint faces and that should do the trick.
The seat will be visiting Calgary Seat Cover on Monday. I have a reproduction seat cover, and I was going to re-cover the seat myself as it isn't really a difficult job. However when I did a dry fit, I found that with age, the seat foam had shrunk and hardened enough that the shape was not correct, plus of course it would not be very comfortable to sit on ! The folks at Calgary Seat Cover will re-skin the seat with a thin layer of fresh, high density foam to restore the original shape, and also install the cover for a very reasonable price so it makes good sense to just let them do it for me. I will install the stainless steel seat trim myself and it should be good to go !
Back to Top
Pipe CLeaning and Mini-Rollout

Two stroke exhausts can accumulate a lot of carbon build up, but I admit I was surprised at just how much there was in these. I made a scraper with a hooked end on it out of some flat bar I had (which is visible in the photo to the upper right), and then went around the inside of the pipe between each baffle till I had quite the pile of accumulated coke and carbon sitting on my work table. And this was only from the two larger pipes ! I also managed to clean out a slightly smaller pile from the two smaller centre pipes !!
Of course now I just have to be careful to not have anything white behind the bike the next time I start it up, as I've no doubt that there are all sorts of small oily bits of carbon loose inside the pipes which will expel all over anything behind me - might be fun actually .....

I still need to put the warning labels and decals on, add the seat trim, and I do not doubt that I will have to play with the carburettors a bit more, but it is quite close to being completed now. Of course I'm biased, but I think its looking pretty good !
Back to Top