
Long ago – September 9th of this year to be exact – I wrote about prepping a few parts and pieces for the local CVMG Club’s “Powder Day” at a local shop here in Calgary. After getting all 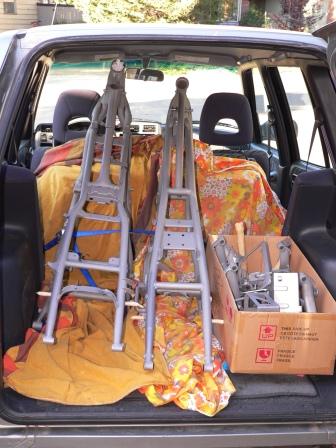 the parts cleaned up at Consolidated Compressor (I wrote about them previously here) they looked as you see in the photo to the left. What you see are two frames – a 1973 Suzuki GT750 to the left and a 1977 Suzuki GT500 to the right. Links to the project sites for these bikes are here and here.
The smaller parts I blasted in a glass bead cabinet, and the frames were done outside, using the Consolidated Compressor high-p ower sand blasting set up. The glass bead cleaning process certainly was much more ‘gentle’ than sand blasting, safer to use for small parts certainly, and it left a much nicer finish on the items I was cleaning. It was no where near as fast as using sand however, nor was it quite so satisfying – there is something about ripping the surface off of rusty old metal that is strangely appealing ! . Once I had the parts home, I blew them off with compressed air and then washed them down with brake cleaner, to ensure they were spotlessly clean and free of any oil or grease which would affect the quality of the powder coat. I also used shop gloves (disposable blue nitrile gloves) to try to avoid as much as possible getting any oils from my hands onto the clean metal
I hadn’t actually seen powder coating done before and so for me at least it was quite interesting. The parts are suspended from metal racks using wire hangers to ensure good electrical conductivity, as the parts are polarized to attract the powder (you can see the static charge lead in the right of the photo to the right) and then sprayed using a special electrostatic spray gun. After the powder is sprayed on to the electrically charged parts, everything goes into an oven. Lots of colours are available – I suppose I’m a bit of a traditionalist as I stayed with low gloss black, but perhaps next time I’ll try one of the bright reds or yellows !
The photo below to the left shows the parts fresh out of the oven, and cooling down after baking at 400 F for 40 minutes. Touch-ups are possible – powder coating items with sharp inside edges  such as battery boxes or the inside radius of tight bends are a potential issue as it is difficult to get the powder into these areas and I did have to have a couple of pieces re-done, but over all it went quite well.
The last shot to the right shows the parts just before I unloaded them at home !
I have temporarily assembled both bikes as rolling chassis’, as it is much easier to handle them when they are on wheels ! Now the interesting part starts !
Several of the chrome plated parts are in very poor shape, especially on the 1973 GT750 so I’ve looked around for a chrome plating outfit to redo a few of the parts. Its surprising the range of opinion you get when you start trying to get recommendations for custom metal work – many of the folks I asked at custom bike shows advised me to not use any chrome shops in the Calgary area ! On the other hand, shipping costs start to become a real issue with large metal objects, so having someone local that you can easily deal with is a plus. The other aspect to be considered is the level of re-chroming actually desired. Most Japanese bikes in the 1970’s had relatively poor quality chrome plating. Spot welds are clearly visible for example, and if you look closely there are many small imperfections in the finish – it certainly isn’t the ‘show quality chrome’ you see on modern custom bikes. Over doing the quality of the finish on a restoration is a common mistake people make, and in many ways detracts from the authenticity of the restored bike, as well as adding a lot of unnecessary cost.
In the end I’ve decided to try Alberta Plating Ltd. as a couple of members of the local Calgary ‘Loyal Order of Water Buffalo’s’ spoke well of them. This week I dropped off a couple of fenders – one of which is in really rough shape – just to see what sort of work they do. They should be ready just after Christmas and I’ll post a few photos. If I like the work they do, then I have about another half dozen bits and pieces for them to do for both the 1973 GT750, as well as the 1972 GT750 I’ll be doing up next winter.