
After 40 odd years (I suppose some of them were ‘normal’, but I digress) the check valves in the oil injection lines used by Suzuki for the GT750 as well as other oil injected two strokes are starting to be a problem. Naturally, you can’t buy new ones and of course parts a person could have purchased from Suzuki to try to repair old sets have since been discontinued. The problem area is the small check valve in the end of the line as per the photo below.

When these check valves fail, the contents of your injector oil tank drain through the pump and into the crankcase. This causes a lot of smoke when the engine is started as this extra oil must be burnt off which, while not exactly environmentally friendly, is a benefit in this part of the world as it reduces the mosquito count. A more serious issue is that in extreme cases, if enough oil has accumulated then a slug of oil can hydraulically lock the engine causing a lot of damage. For this reason, when I first start up my bikes in the spring, I first spin the engines over with the spark plugs removed just to see what, if any, surplus oil there may be.
As others have confirmed, while it is possible to take the ends of the oil injector lines apart there are a couple of issues – one is that even after carefully cleaning and reassembling the valves, they often continue to leak, and secondly my own experience is that it is not easy to consistently disassemble the ends without doing some damage. By this I mean that at the moment I don’t see someone being able to offer a refurbishment service and cover their costs. As a result, like others I was faced with prospect of accumulating a large collection of ‘dead’ oil distribution sets.

As mentioned earlier, I did do some checking and confirmed that Suzuki did at one time make all the bits you’d need to build your own set-up using the appropriate sized hose.
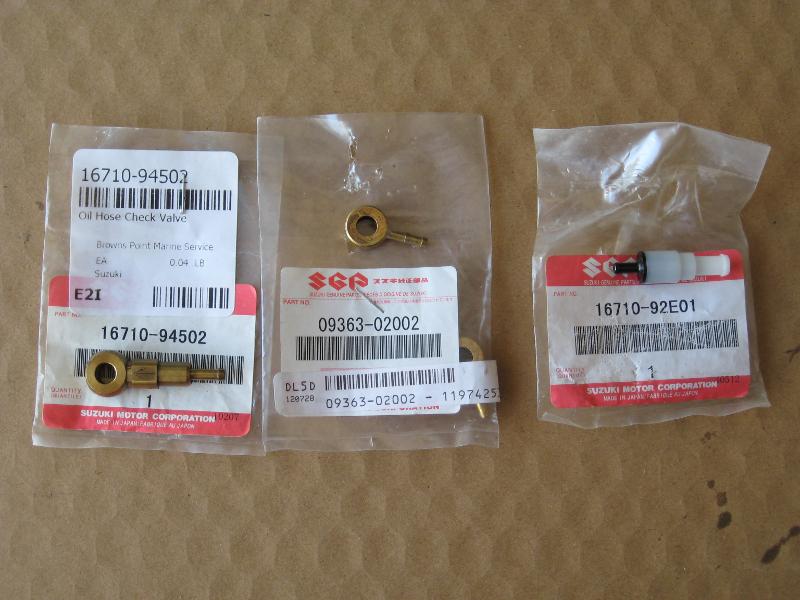
In addition to the in-line check valve on the right of the photo there is another that I haven’t been able to get hold of under part number 16710-94531. The key part is the check valve banjo fitting on the left of the photo (16710-94502) which is perfect, but regrettably is not longer available. The centre plain banjo fitting is still available.
So I have taken another route first suggested by Chris (Coyote on the Sundial board) to splice good components together.

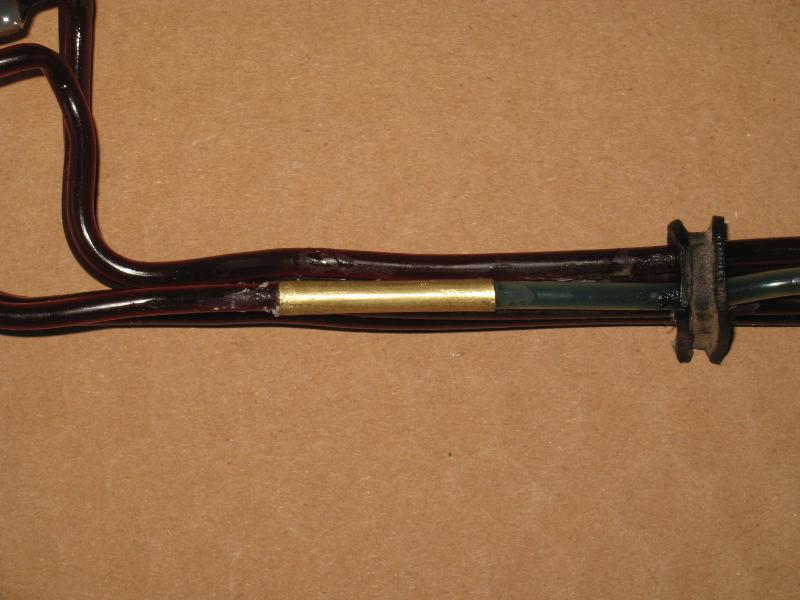
I used some 4mm ID brass tubing from a hobby shop – I did increase the inside diameter a bit as the nylon tubing is nominally 4mm OD and so was often too tight an interference fit. The tricky bit was identifying the correct adhesive as nylon is notoriously difficult to glue. Commercially, and I expect originally, a product called “aqueous phenol” was used as it promotes a molecular bond in nylon to nylon fittings. It is also hazardous and while I have access to some via a local plastics company, I can’t buy it myself. I tried a number of other epoxies and CA type cements/adhesives from hobby shops. You can get CA products that work well on oily environments and which are used in model aircraft, but after doing some testing I found that the bond didn’t hold with the nylon tubing. After several heat cycles and exposure to fuel and oil, I could make most of the joints fail. I don’t have access to the araldite products used in the UK, but after looking at what specification sheets I could find, I’m not sure it would work longer term either. After some looking around I found this product.

The specification sheets for it are located at this link and at this link, and you will see that it has been tested and works well for nylon and other difficult to glue materials. It does not bridge gaps, so close fitting is required.
So – that is my plan for the moment. Rather than try and fix the ends, I will replace them completely by splicing in good ones, and while that isn’t a long term solution it will do for a while. For a long term solution, something like this would be the way to go which was made by Dan in the USA.
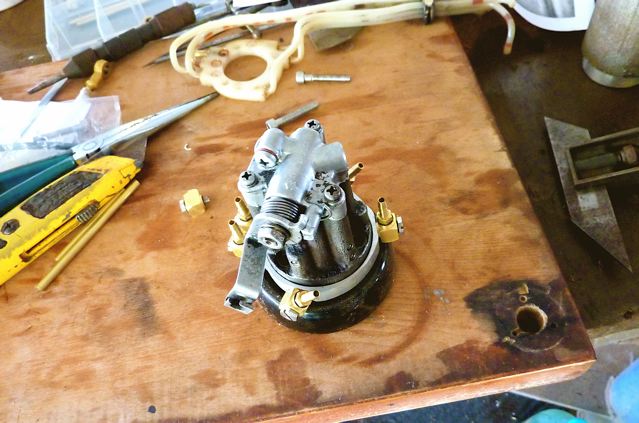
This is a hand made aluminium base ring with check valves installed at the ring and then tubing run to plain banjo fittings at the ends. A project for another day I think !
Hello Ian!
I hope you started the new year as well as possible and everything goes round… 😉
It`s always a pleasure to come back on your site to find new adds! Thanks for all your
dedication with that stuff!
May be it`s interesting for you that I reproduced the oil valve springs and balls wich I`m
selling in my new shop (still under construction but working ) as a 12 pcs. repair set
with “how to do” informations in German.
If so,…. please check here:
https://hard-to-find-parts.de/epages/aff9fb37-1c0b-4b3c-8be3-a10a53d7f9b8.sf/de_DE/?ObjectPath=/Shops/aff9fb37-1c0b-4b3c-8be3-a10a53d7f9b8/Products/%22VS%2016820-31031/set%22
Have a nice time until next contact!
Kindly regards, Volker from “hard-to-find-parts”